


Blog
How to Improve Efficiency with Key NetDocuments Features Part 1 of 2: Saving Time and Clicks


Jeffrey S. Krause
Senior Legal Technology and
Document Management Consultant
When it comes to improving work processes, have you ever created a list of steps, cut out the ones that seemed meaningless, and then considered your task of processes improvements complete? If you have, or been tempted to, you’ve come to the right place.
Unfortunately, while listing the steps in processes can help organize your thoughts around improvements, stopping your journey at this point is akin to leaving money on the table.
To extract true opportunities for improvement, a list of steps must be analyzed with a keen eye for detail. At Affinity, we generally approach this analysis in two ways:
- Identify seemingly small inefficiencies in an otherwise efficient process and make minor improvements to address them.
- Identify processes that are broken and find a new, more efficient way.
For legal professionals around the world, NetDocuments can support workflow improvements in both approaches. The NetDocuments platform offers numerous functions that save lawyers and their staff a click here, and a keystroke there, adding up to substantial time savings. And, when it comes to dramatic improvements, NetDocuments has features and tight integrations with other technologies that can significantly improve everyday processes.
In part one of this two-part series, I will focus on our first approach and share how NetDocuments can improve your workflow with small, yet impactful, efficiency gains.
Read part two, where I will help you explore how NetDocuments can fix your broken processes.
Simple Tips to Save Time and Clicks in NetDocuments
Whenever you adopt a new software, it can feel overwhelming at first and it’s easy to miss small features that will smooth your day-to-day processes.
Profile Templates, homepage customizations, default locations in ndOffice, and saved searches are just four of those often overlooked features that can reduce how many times you click or change screens in the platform, ultimately helping you be more efficient and productive.
1. Profile Templates
If you are repeatedly filling in the same fields, the same way, it’s time to look at using Profile Templates.
Profile Templates are a simple way to pre-fill one or more profile attributes at once. A simple example is something like an ‘Author’ field. Rather than type your name every time you save a document, you can setup a Profile Template to automatically fill it in each time you upload a document.
How to Set Up a Profile Template
- Create a template: There are several ways to do this, but all of them involve some sort of document save. One of the easiest ways is to upload a document to the cabinet where you want the template stored.
- Enter profile information: Once you have uploaded and selected the document, click Edit Profile/Tags to open a dialog where you can enter the profile information. Start by clearing anything that appears in the fields. Within the Edit Profile dialog, there is a handy Clear Profile option to make this nearly effortless.
- Fill in any fields default value fields: To complete your profile template for our ‘Author’ example, simply complete the Author field with your name. When finished, click Save as Template and then name your template accordingly.
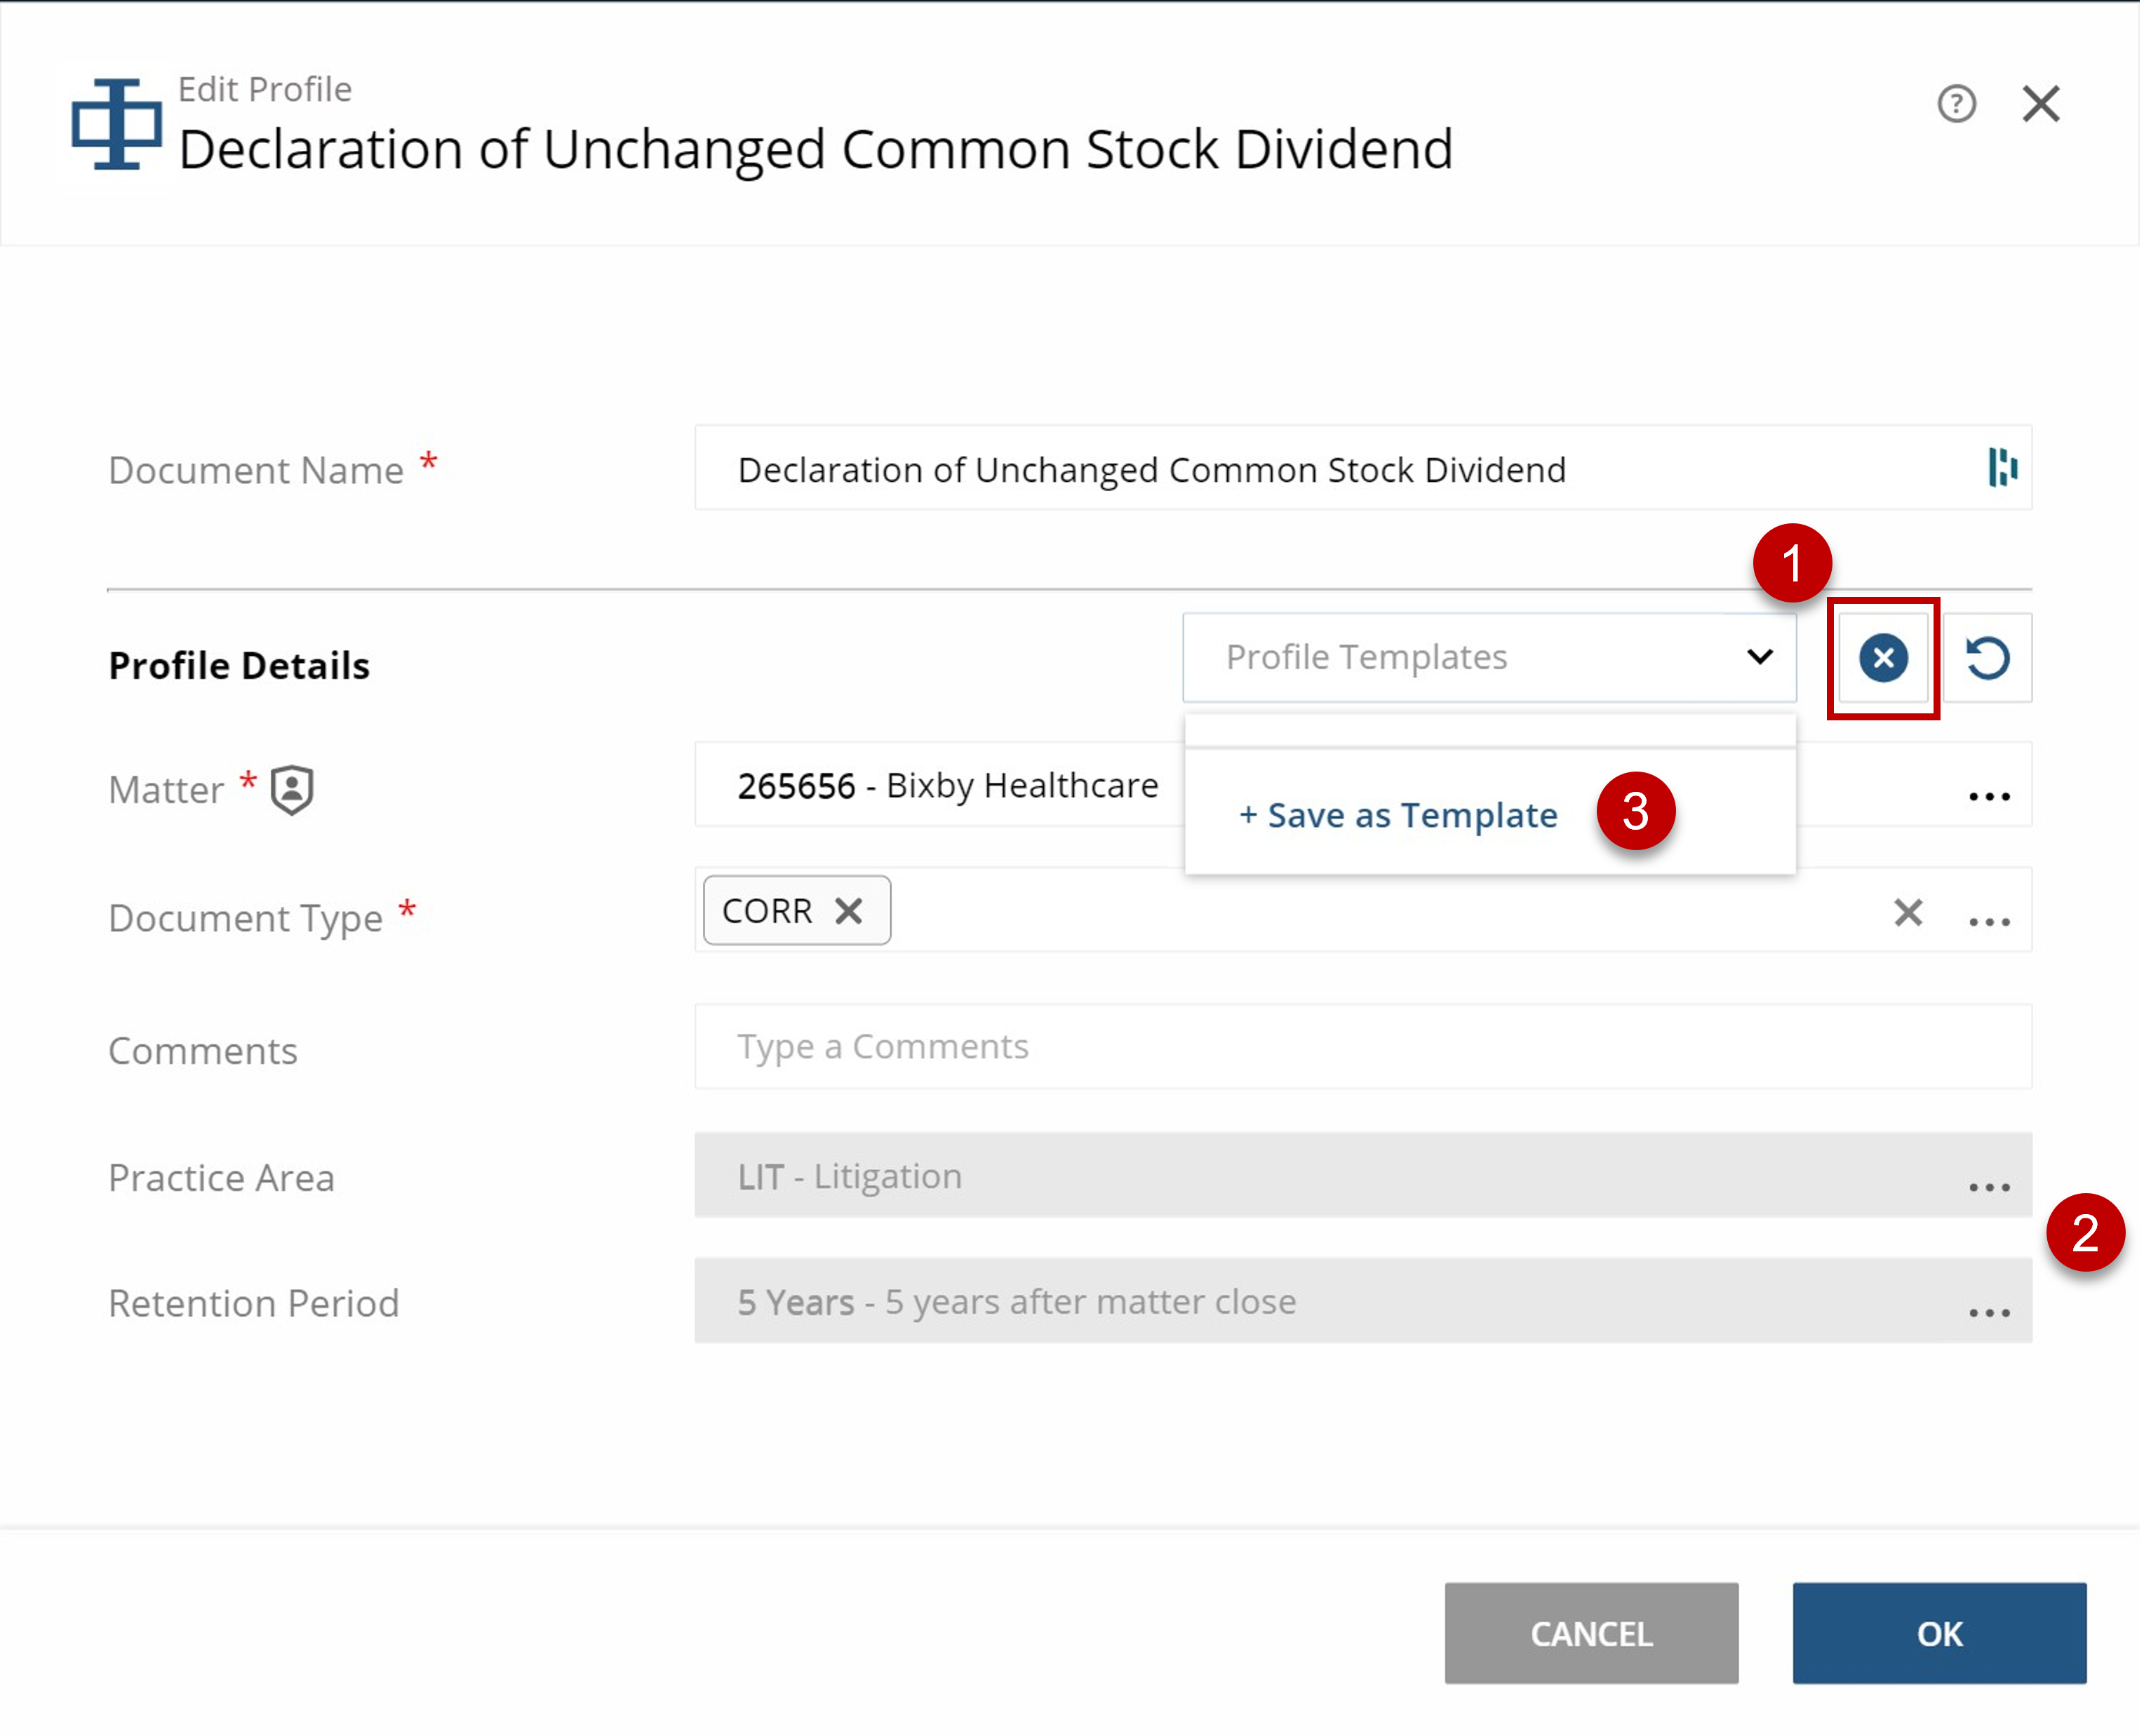
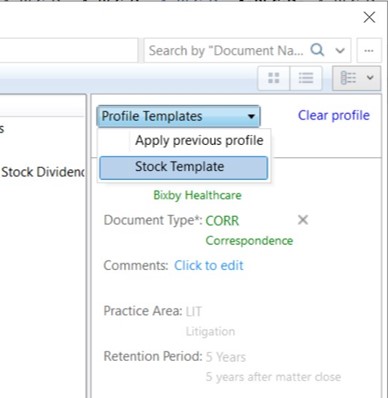
Now that you have created your template, it is available anytime you save a document. For example, just look for Profile Templates within the ndSave dialog box.
Extra Time Savings
Setting a Profile Template as a default cabinet template is a smart idea if you are searching for ways to cut out more steps in your workflow. To do this, simply select Settings from the “Hi menu” and then Application Settings. Scroll to the bottom of the Applications screen and choose a cabinet and the Profile Template you would like to set as the default.
If you were to set your new ‘Author’ template as the Profile Template for a cabinet, the next time you saved a document inside of the assigned cabinet, the template would be applied by default and automatically fill in the Author field with your name.
2. Homepage Customization
Constantly searching for the same few matters or documents? Consider customizing your homepage. Most NetDocuments users already have some homepage customizations, but here are 4 organization tips that will make your homepage especially useful:
- Create personalized sections based on time and topic: Some examples may include Current Projects, Reference, and Agreements.
Current Projects is an example of a section based on time. It contains the workspaces that you are most likely to visit and should be updated as matters or projects are opened or closed.Reference is a topical section. It could contain documents and workspaces where reference materials have been organized for future use.
Agreements is a bit of both. It contains certain older agreements that may be used as a template as well as newer agreements that are being worked on.
- Designate cabinets as favorites: Although switching between cabinets is not difficult, if you work in multiple cabinets throughout the day, you can save time and effort by favoriting those cabinets. When a cabinet is selected as a favorite it takes you directly to the cabinet page, changes the advanced search location, and changes the Go to a workspace orange icon – all with a single click.
- Create a section for Saved Searches: Saved Searches are extremely useful and can help you easily collect new document templates, manage current projects, and more. I will discuss Saved Searches in more detail later in this article but know that having them on your Home Page can create a handy shortcut for your most used searches.
- Create a section for links. Creating a section for frequently accessed links or websites on your homepage makes it simple and efficient to navigate to information not stored in your internal repository.
- Delegate your homepage. Give specific colleagues access to your homepage in order to view or edit its contents. This access can help streamline communications and simplify file organization for paralegals and assistants supporting multiple partners.
3. ndOffice Default Locations
You can choose the default location ndOffice displays when opening or saving from Word, PowerPoint, Excel, etc. and even choose separate default locations for Outlook.
This simple setting can save you time and decision fatigue, and is all accessible via the ndOffice application.
How to Create Default Locations in ndOffice
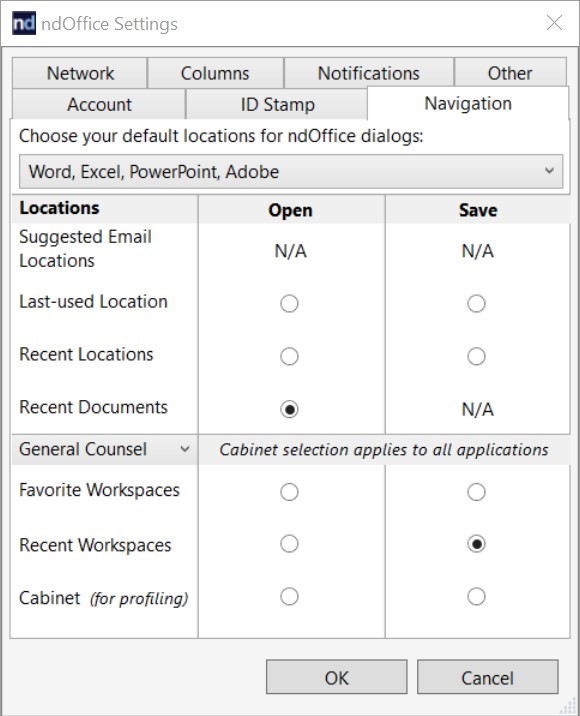
- Open the dialogue box: From the Activity Center, select the gear/cog symbol and choose Settings, then click on the Navigation tab.
- Select your default settings: Choose your settings wisely, based upon the way you normally work. For example, I tend to open documents that are already in recent documents, and I tend to save to a recent workspace within my organization’s Clients cabinet. My settings reflect this.
Setting a default location does not mean that you cannot manually change the location displayed when you Open or Save a file. It simply changes what is initially displayed by default, which can save you a few clicks and decisions over the course of your workday.
4. Saved Searches
Saved Searches are one of many hidden gems in NetDocuments. This feature has various uses beyond the obvious ability to save search criteria, and can save you time and effort when used correctly. Here are just a few of the ways you can use Saved Searches to your advantage every day:
- Client-Level Saved Searches: Assuming your workspaces are based on clients and matters, you can create several useful Saved Searches at the workspace level.
For example, you could create a Saved Search called “All Documents for this Client” that searches through all workspaces related to that client, enabling you to quickly search from a global client view even when you are working within a specific matter. Variations of this technique include more specific client-level searches that show all emails or all recent emails (such as the last 30 days).
Saved Searches can be created individually on any workspace. Simply go to the workspace, pull down the arrow after the workspace name, and select ‘Add Saved Search’. For extra time savings, add a Saved Search to workspace templates so that they appear automatically when a new workspace is created.
- Using Date Ranges in Saved Searches: Adding date ranges into your saved searches is a terrific way to stay up to date on the most recent documents, communications, and developments within a matter.
Saved Searches, work by entering a number of days rather than exact dates. For example, if I wanted to look for documents modified in the last 30 days, I could enter -30 to +0 in the Modified/Sent Date search fields. The search would bring back results only within the last 30 days.
This type of date range Saved Search is useful in a variety of places, including workspaces and your Home Page.

- Sorting and Grouping: Whether it is within a workspace or on your Home Page, Saved Searches can help you group items in ways that make the most sense for your work processes.
Some strategies that you can use include a Saved Search for all emails to or from a specific person. As new emails come in, they will be automatically found within the search.
Another handy use case would be for building a pleadings index. You would need a few additional fields to track the specifics, but a Saved Search could easily display everything that needs to be included in the index and sort the results using a date or other field. This would give you quick access to pleadings your firm has already handled so you can improve upon past work, rather than reinventing the wheel every time.
- Reports: If you don’t have Analytics from NetDocuments, Saved Searches are a great way to create reports in NetDocuments.
Do you want to know how many Contracts were finalized last month? Assuming you have fields that track these data points, create a Saved Search with the following:
Document Type = Contract, Status = Final, and Contract Date = -30 to + 0
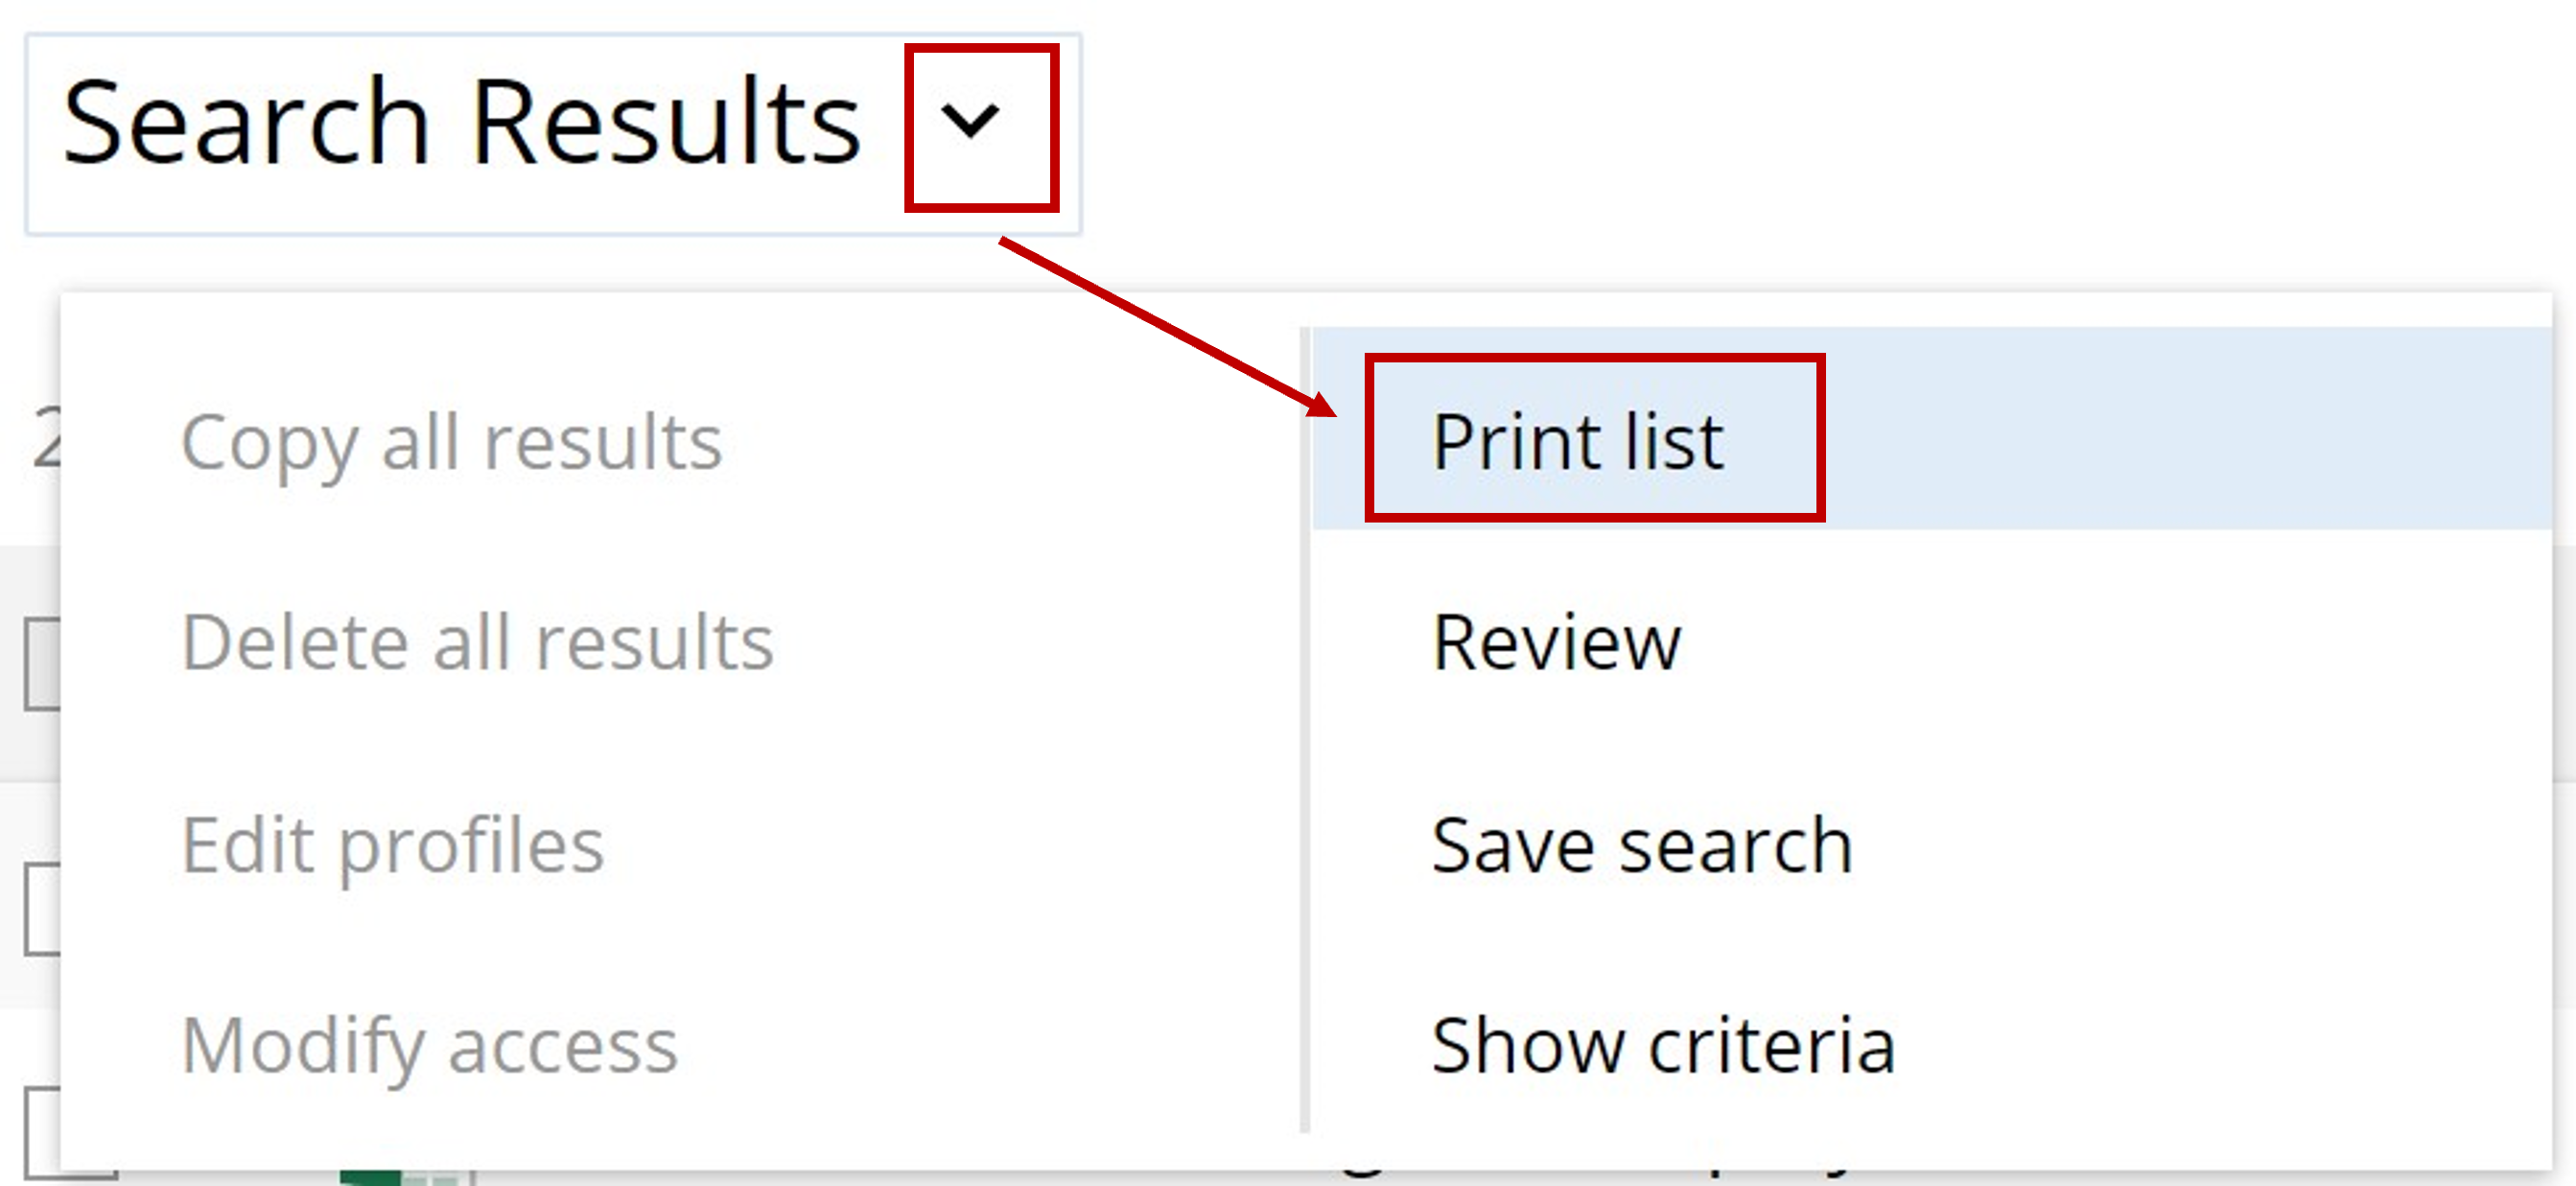
Running the Saved Search will return the number of finalized contracts in the last 30 days. Even better, the down arrow after the Search Results will allow you to ‘Print List’. From there, you can choose which columns to display and how you would like the report delivered.
How to Create a Saved Search
Creating a Saved Search in NetDocuments is very easy and intuitive.
- Perform a search Navigate to the search bar and type in your search criteria.
- Save the search criteria From the pulldown arrow after the words ‘Search Results’ select ‘Save Search’.
- Select the save location: This last step is likely the trickiest part of Saved Searches. Unlike other systems where searches are saved somewhere within the search dialog, NetDocuments requires you to save the search in a location, such as a folder or workspace, including your personal one.
If the Saved Search relates to a workspace, this is easy—save the search within the desired workspace. But what do you do if the search is broader than one client or represents a report? One suggestion is to create a Saved Search Library workspace in a location accessible to everyone who needs access to the searches, which provides everyone with a one stop shop for quick information.
Remember: Saved Searches belong to you, not the organization, and can help you customize file organization in a way that makes sense to you personally without impacting your company’s filing methods.
Conclusion
In the first part of this two-part series, I have touched on the various hidden gems and functions within NetDocuments that can save you a click here and there, or perhaps a change of screens now and then. When used together, these little improvements can compound over time and have significant impacts on both your personal and organization efficiency.
In part two of this series, I will share NetDocuments tools that can have a dramatic impact on workflow by changing your processes for the better.
Ready to take your workflow to the next level? Affinity Consulting can help you implement NetDocuments for the first time or optimize your existing NetDocuments workflow. Learn more here.
About the Author
Jeffrey S. Krause is partner with Affinity Consulting Group. He is a Wisconsin attorney who has spent over 20 years helping other lawyers choose the right technology and use it the right way. Connect with him on Linkedin.
Explore these other blogs
-

- Blog
Six New AI-Powered Apps Join the ndMAX Studio for Trademark Prosecution and Plaintiff Litigation
Jared BecksteadSenior Product Marketing Manager, AINetDocuments We’re excited to introduce six…
-

- Blog
AI Document Management Systems: What Legal Leaders Need to Know
Imagine if your document management system didn’t just store documents, but…
-

- Blog
Beyond Folders: Why Law Firms Are Rethinking Document Management
Hayley Leung Legal Solutions Expert For many law firms, document management…
-

- Blog
MCP Is Standard. What You Get Through It Isn’t.
Jared Beckstead Senior Product Marketing Manager – AI MCP is everywhere…
netdocuments